1. Scrapy爬虫框架介绍
Scrapy SKRAY-pee是一个Python编写的开源网络爬虫框架。它是一个被设计用于爬取网络数据、提取结构性数据的程序框架。该框架主要由Scrapinghub 公司进行维护。 ——维基百科
1.1. Scrapy的安装
普通环境下:pip install scrapy。
Anaconda:conda install scrapy 或在图形界面操作。
验证安装:在命令行输入scrapy -h,打印出正确的版本和帮助信息,说明安装成功。
1.2. Scrapy爬虫框架结构
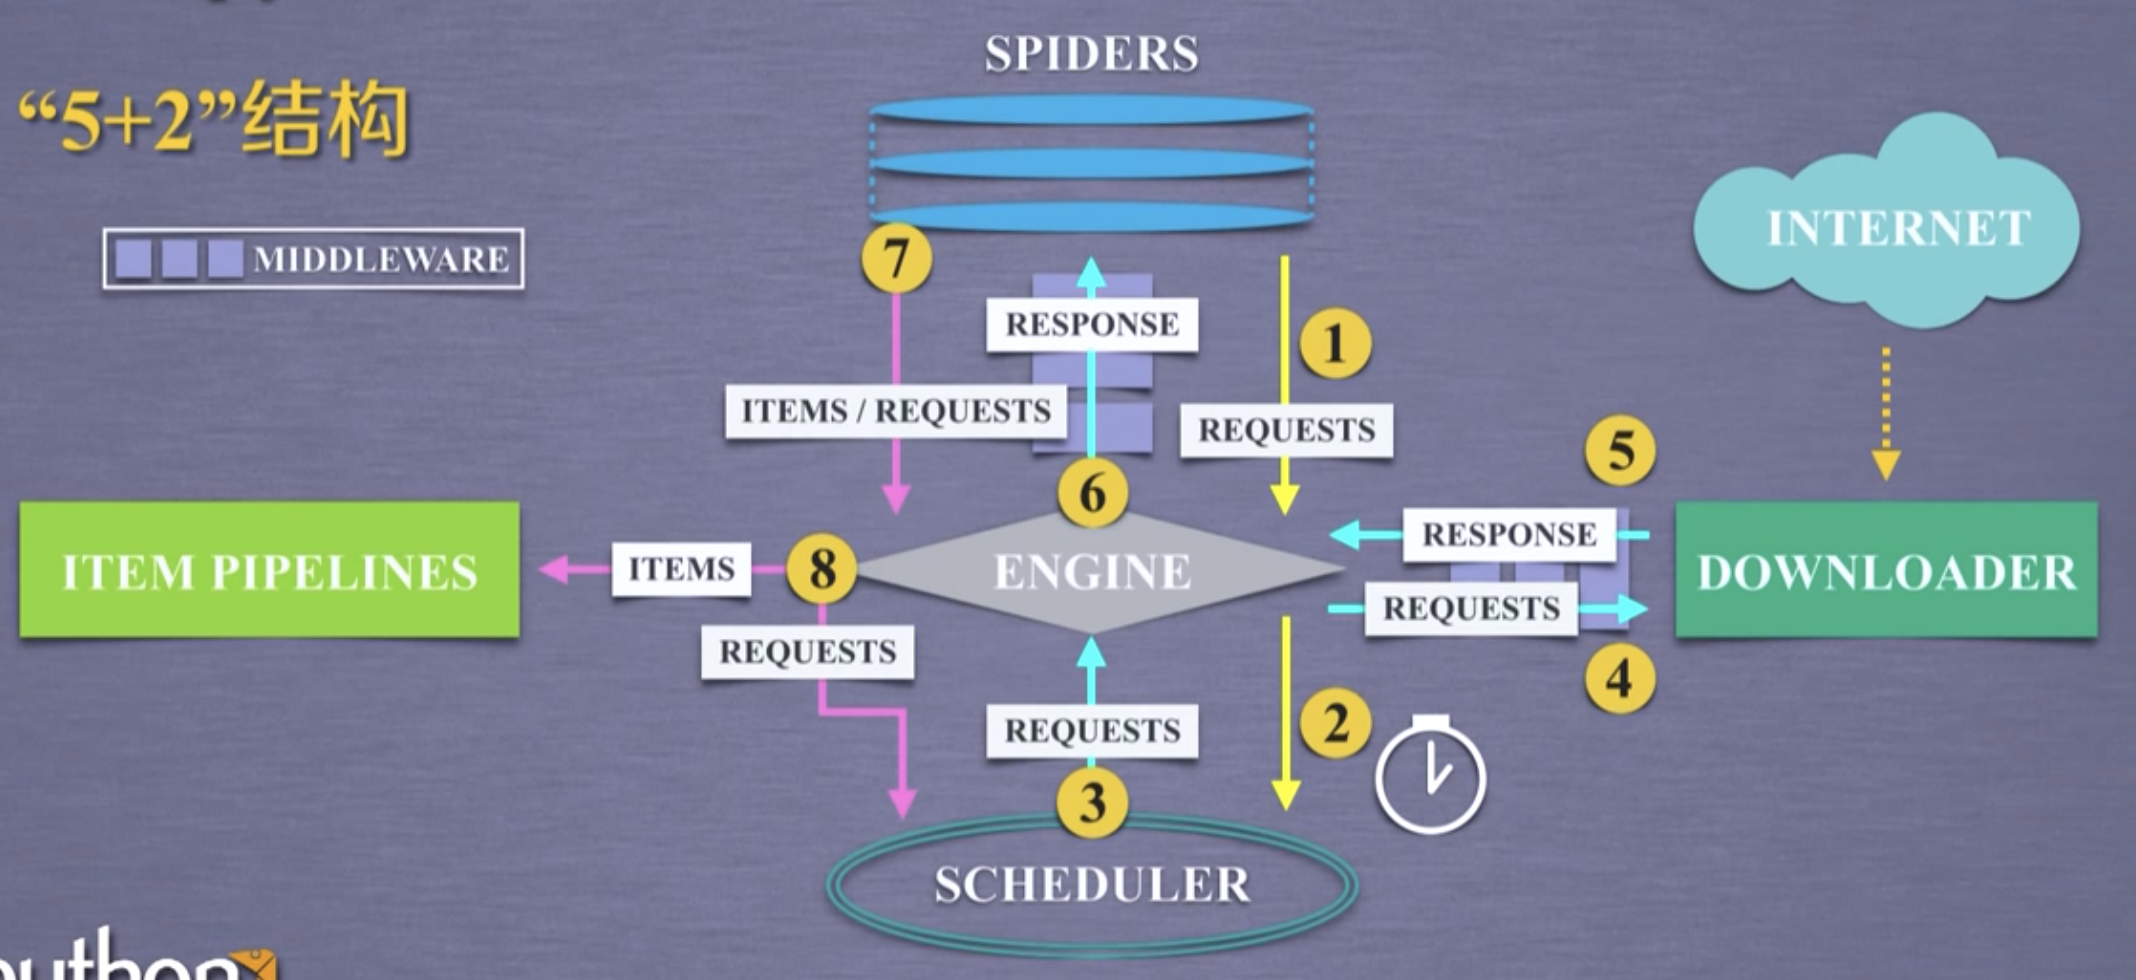
Scrapy一共有7个部分,为“5+2结构”,其中5个部分为框架的主体部分,2个部分为中间件。
5个主体:Engine,Scheduler,Item Pipelines,Spiders,Downloader。
2个中间件:Engine和Spiders之间的Spider Middleware,Engine-Downloader之间的Downloader Middleware。
数据(包括网络爬虫提交的请求)以及从网络中获取的相关内容,在5个主题模块之间流动,形成数据流。
Scrapy包含3条主要的数据流路径:
路径1:从Spiders模块途经Engine模块到达Scheduler模块。
Engine从Spiders中获取用户的爬取请求(Requests)并转发给Scheduler。
路径2:从Scheduler模块途经Engine模块到达Downloader模块,最终数据(Response)从Downloader模块途经Engine模块返回Spiders模块。
Engine从Scheduler获取下一个爬取请求(此时的请求是真的要去网络上爬取内容的请求),Engine获取请求后,将请求发送给Downloader。Downloader拿到请求后,连接互联网爬取相关网页,再将爬取的内容形成一个对象(Response 响应),最后将这个对象通过Engine发送给Spiders。
路径3:从Spiders模块途径Engine模块到达Item Pipelines模块和Scheduler模块。
Spiders处理从Downloader获得的响应(Response,也就是从网络中爬取的相关内容),处理后产生了两个数据类型的数据,分别为爬取项(Scraped Items,也叫Items)和新的爬取请求(Requests,当我们爬取一个网页后,网页中存在其他我们想要爬取的URL,则可以在Spiders中增加相关功能,对新的URL再次发起爬虫请求)。Spiders将这两个类型的数据发送给Engine。Engine分别将Items发送给Item Pipelines,将Requests发送给Scheduler,为后续的数据处理以及再次启动网络爬虫提供了数据来源。
Srapy爬虫框架的执行从Spiders向Engine发送第一个请求开始,到获取并处理全部爬取内容,存入Item Pipeline为止。即框架入口为Spiders,出口为Item Pipeline。
Srapy爬虫框架的5个主要模块中,Engine、Scheduler、Downloader为已有实现,Item Pipelines、Spiders需要用户编写(配置)。其中Spiders向整个框架提供待爬取的URL链接,解析从网络中获得的页面内容;Item Pipelines负责对提取的信息做最后处理。
注:Engine和Spiders、Engine和Downloader之间的数据流通均需要使用中间件。
2. Spider爬虫框架解析
2.1. 5个主要模块
Engine:控制所有模块之间的数据流,根据条件触发事件。不需要用户修改。
Downloader:根据请求下载网页。不需要用户修改。
Scheduler:对所有爬取请求进行调度管理。不需要用户修改。
Spiders:解析Downloader返回的响应(Response),产生爬取项(Scraped Items),产生额外爬取请求(Requests)。需要用户编写配置代码。
Item Pipelines:以流水线方式处理Spider产生的爬取项。由一组操作顺序组成,类似流水线,每个操作是一个Item Pipeline类型。可能的操作包括:清理、检验和查重爬取项中的HTML数据、将数据存储到数据库。需要用户编写配置代码。
2.2. 2个中间件
Downloader Middleware:对Engine、Scheduler和Downloader之间的数据流进行用户可配置的控制。即修改、丢弃、新增请求或响应。用户可以编写配置代码。
Spider Middleware:对请求和爬取项再处理。修改、丢弃、新增请求或爬取项。用户可以编写配置代码。
3. Scrapy爬虫的常用命令
3.1. 常用命令
Scrapy是为持续运行设计的专业爬虫框架,提供操作的Scrapy命令行,可在终端输入scrapy -h查看。
1 | (base) localhost:hexo gukaifeng$ scrapy -h |
可以看到,Scrapy命令行格式为scrapy <command> [options] [args],<command>为Scrapy命令,Scrapy常用命令主要是下面6个。
| 命令 | 说明 | 格式 |
|---|---|---|
startproject |
创建一个新工程 | scrapy startproject <name> [dir] |
genspider |
创建一个爬虫 | scrapy genspider [options] <name> <domain> |
settings |
获得爬虫配置信息 | scrapy setting [options] |
crawl |
运行一个爬虫 | scrapy crawl <spider> |
list |
列出工程中所有爬虫 | scrapy list |
shell |
启动URL调试命令行 | scrapy shell [url] |
3.2. Scrapy爬虫的命令行逻辑
为什么Scrapy采用命令行创建和运行爬虫?
命令行更容易自动化,适合脚本控制。
本质上,Scrapy是给程序员使用的,功能更重要。
4. 第一个Scrapy爬虫实例
演示HTML页面地址:http://python123.io/ws/demo.html ,文件名称demo.html。

使用Srapy库首先要产生一个Scrapy爬虫框架,步骤如下:
建立一个Scrapy爬虫工程。
1
2
3
4
5
6
7
(base) localhost:Documents gukaifeng$ scrapy startproject ScrapyDemo
New Scrapy project 'ScrapyDemo', using template directory '/Users/gukaifeng/anaconda3/lib/python3.7/site-packages/scrapy/templates/project', created in:
/Users/gukaifeng/Documents/ScrapyDemo
You can start your first spider with:
cd ScrapyDemo
scrapy genspider example example.com生成的ScrapyDemo工程目录
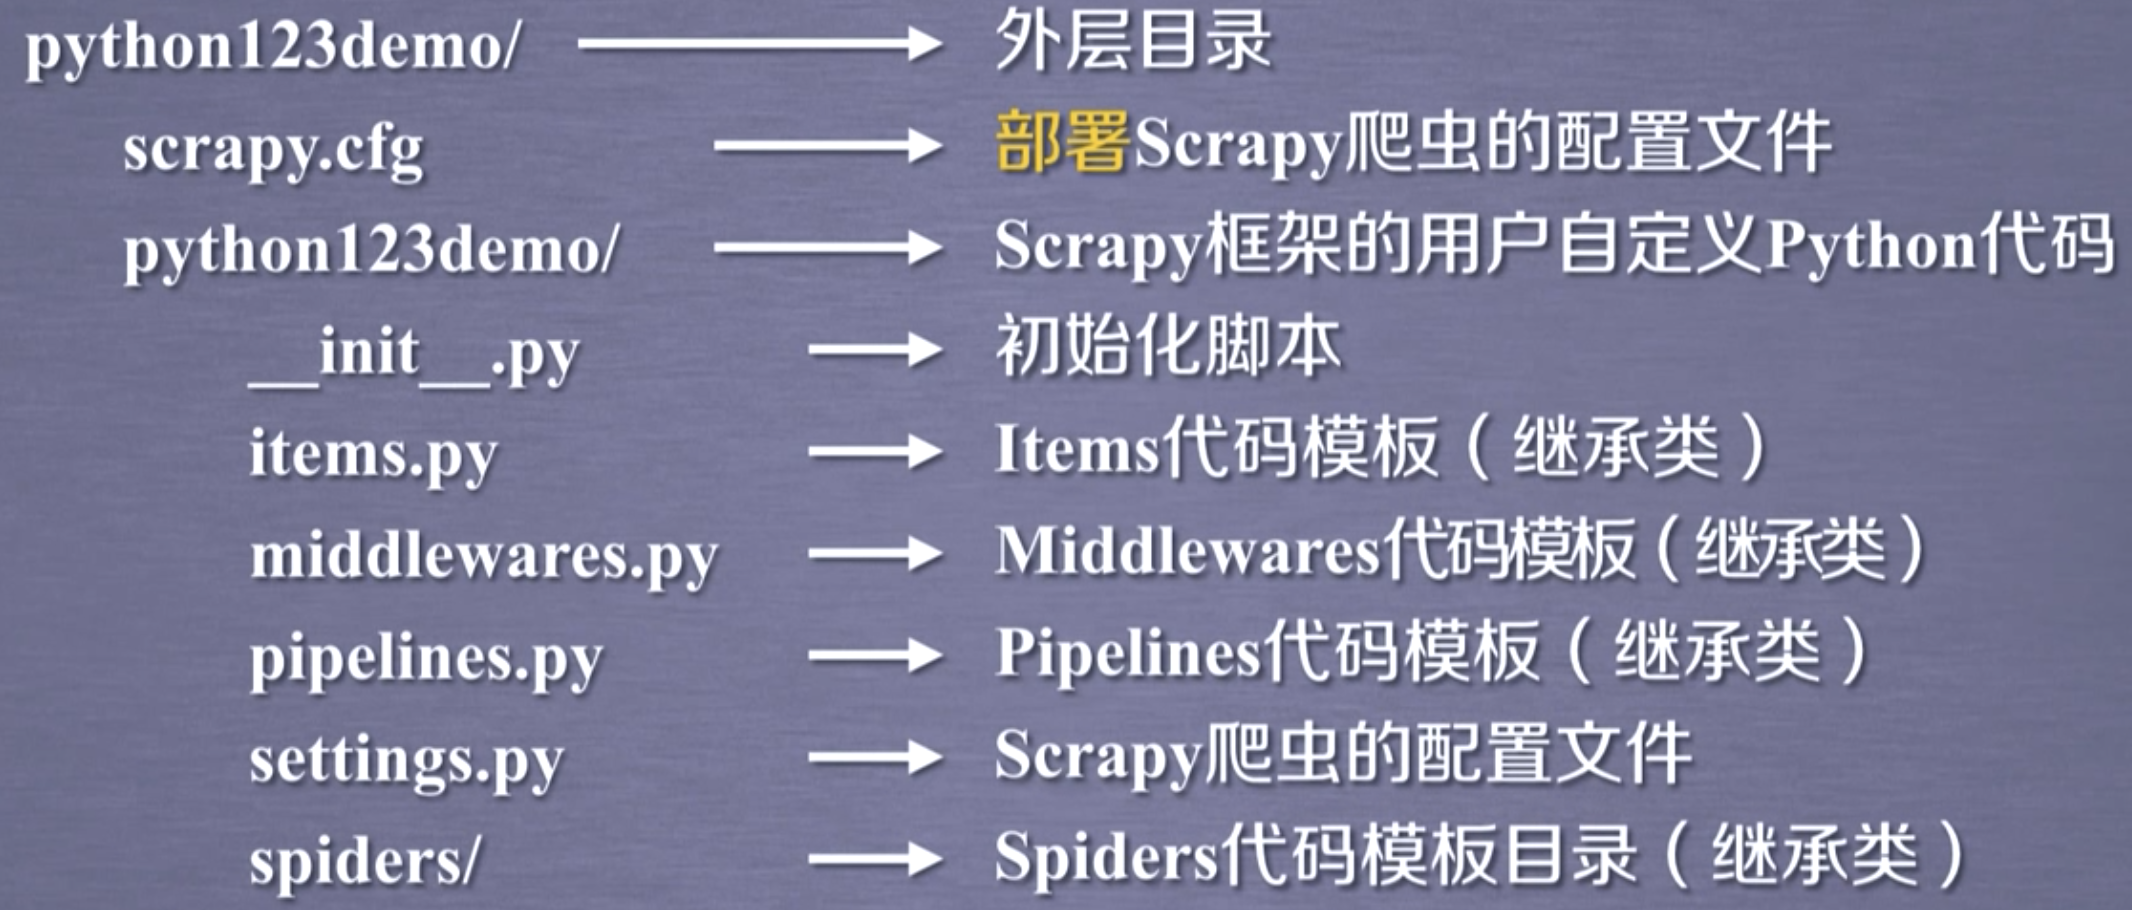
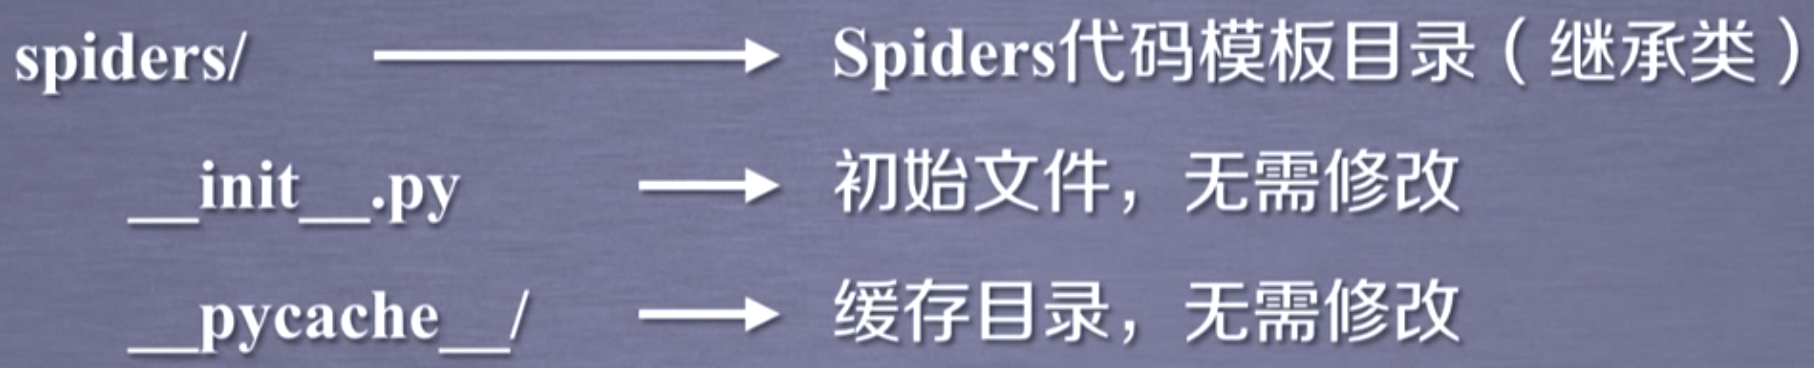
ScrapyDemo/spiders/目录
在工程中产生一个Scrapy爬虫。
1
2
3
4
(base) localhost:Documents gukaifeng$ cd ScrapyDemo
(base) localhost:ScrapyDemo gukaifeng$ scrapy genspider demo python123.io
Created spider 'demo' using template 'basic' in module:
ScrapyDemo.spiders.demo这时会在ScrapyDemo/spiders/目录产生一个demo.py文件,查看器内容为
1
2
3
4
5
6
7
8
9
10
11
# -*- coding: utf-8 -*-
import scrapy
class DemoSpider(scrapy.Spider):
name = 'demo'
allowed_domains = ['python123.io']
start_urls = ['http://python123.io/']
def parse(self, response):
pass其中
name为此爬虫的名字;allowed_domains为用户在命令行输入的URL,爬虫只能在这个URL下面进行爬取;start_urls爬虫初始爬取的链接链表;parse()用于处理响应,解析内容形成字典,发现新的URL爬取请求。配置产生的spider爬虫
这里以,将爬取的HTML页面存储为本地文件,为例,配置 demo.py 文件。
1
2
3
4
5
6
7
8
9
10
11
12
13
14
# -*- coding: utf-8 -*-
import scrapy
class DemoSpider(scrapy.Spider):
name = 'demo'
# allowed_domains = ['python123.io']
start_urls = ['http://python123.io/ws/demo.html']
def parse(self, response):
fname = response.url.split('/')[-1]
with open(fname, 'wb') as f:
f.write(response.body)
self.log('Save file %s.' % name)上面demo.py文件其实是简化版,Scrapy支持的完整版写法如下。戳
yield关键字用法。1
2
3
4
5
6
7
8
9
10
11
12
13
14
15
16
17
18
19# -*- coding: utf-8 -*-
import scrapy
class DemoSpider(scrapy.Spider):
name = 'demo'
def start_requests(self):
urls = [
'http://python123.io/ws/demo.html'
]
for url in urls:
yield scrapy.Request(url=url, callback=self.parse)
def parse(self, response):
fname = response.url.split('/')[-1]
with open(fname, 'wb') as f:
f.write(response.body)
self.log('Save file %s.' % name)完整写法中
start_requests()是一个生成器,每次只返回一个请求,这在有大量(如1M,10M,100M)待爬取URL时,能极大的节省时间与空间。运行爬虫,获取网页。
输入下面命令,运行爬虫,结束后可以在最外层目录ScrapyDemo下找到爬取的demo.html文件。
1
scrapy crawl demo
5. Scrapy爬虫的基本使用
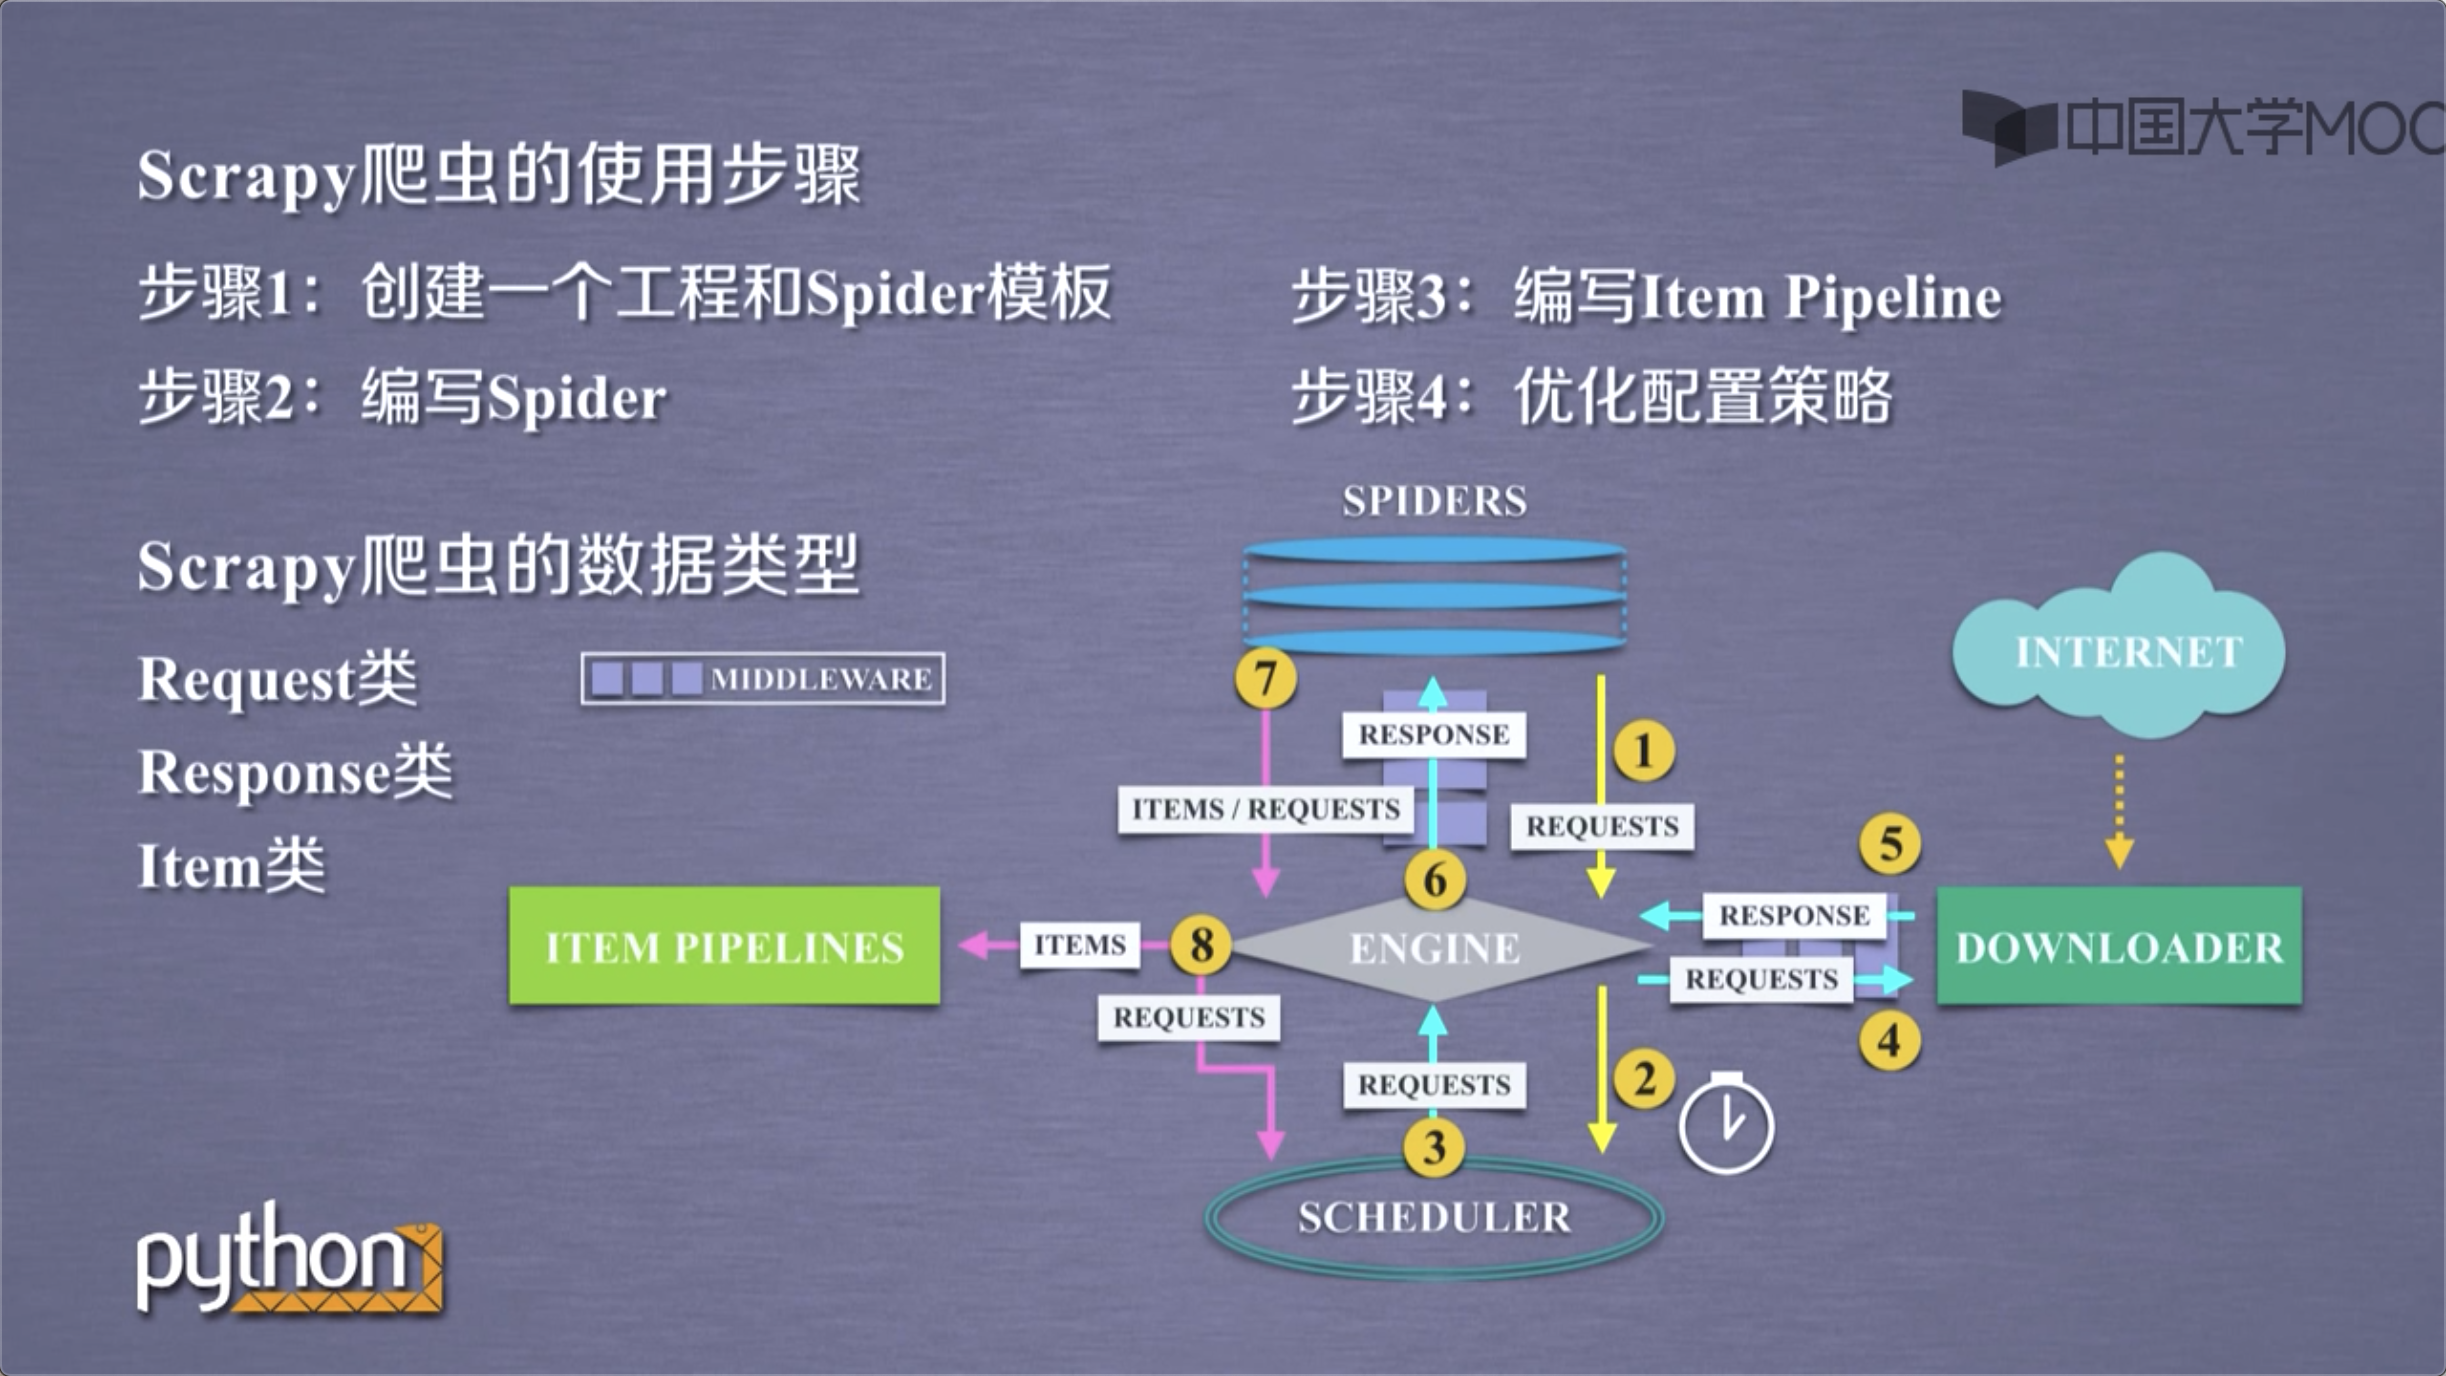
5.1. Scrapy爬虫的使用步骤
步骤1:创建一个工程和Spider模板;
步骤2:编写Spider;
步骤3:编写Item Pipeline;
步骤4:优化配置策略。
5.2. Scrapy爬虫的数据类型
Scrapy爬虫主要由3种数据类型,Request类、Response类和Item类。
5.2.1. Request类
class scrapy。http.Request()
- Reques对象表示一个HTTP请求;
- 由Spider生成,由Downloader执行。
Request类包含6个常用属性或方法:
| 属性或方法 | 说明 |
|---|---|
| .url | Request对应的请求URL地址。 |
| .method | 对应的请求方法,’GET’和’POST’等。 |
| .headers | 字典类型封装的请求头。 |
| .body | 请求内容主题,字符串类型。 |
| .meta | 用户添加的扩展信息,在Scrapy内部模块间传递信息使用。 |
| .copy() | 复制该请求。 |
5.2.2. Response类
class scrapy。http.Response()
- Response对象表示一个HTTP响应。
- 由Downloader生成,由Spider处理。
Response类包含7个常用属性或方法:
| 属性或方法 | 说明 |
|---|---|
| .url | Response对应的URL地址。 |
| .status | HTTP状态码,默认是200。 |
| .headers | Response对应的头部信息。 |
| .body | Response对应的内容信息。 |
| .flags | 一组标记。 |
| .request | 产生Response类型对应的Request对象。 |
| .copy() | 复制该响应。 |
5.2.3. Item类
class scrapy。item。Item()
- Item对象表示一个从HTML页面中提取的信息内容;
- 由Spider生成,由Item Pipeline处理;
- Item类似字典类型,可以按照字典类型操作。
6. Scrapy爬虫提取信息的方法
Scrapy爬虫支持多种HTML信息提取方法,主要用在Spider中。
- Beautiful Soup
- lxml
- re
- XPath Selector
- CSS Selector
这里介绍下CSS Selector,因为前几个都介绍过了。
CSS Selector是另外一种国际公认的HTML页面的信息提取方法,由W3C组织维护并规范。
CSS Selector的使用格式为:<HTML>.css('a::attr(href)').extract()。
<HTML>为HTML页面变量,a为标签名称,href为标签属性。
7. Scrapy的地位
- Python语言最好的爬虫框架;
- 具备企业级专业爬虫的扩展性(7×24高可靠性);
- 千万级URL爬取管理和部署。
Scrapy足以支撑一般商业服务所需的爬虫能力。
8. Scrapy的应用展望
普通价值
- 基于Linux,7×24,稳定爬取输出;
- 商业级部署和应用(scrapyd-*);
- 千万规模内URL爬取、内容分析和存储。
高阶价值
- 基于docker,虚拟化部署;
- 中间件扩展,增加调度和监控;
- 各种反爬取对抗技术。